Lecture 1b: Version control with Git
Keeping track of all of the changes in your project over time is good practice. How many times have you edited something in something you were writing and then wanted to go back and see what you had in the first place? Wouldn’t it be great to know what changes you made and when you made them?
A version control system facilitates this process of keeping track of changes over time. Beyond that, it allows multiple people to collaborate and work on parts of the same project simultaneously. We will use version control extensively in class, both for collaboration among teammates, and for homework submission and grading.
There are many version control systems. The four most prominent, in order of age, oldest to youngest, are CVS, Subversion, Git, and Mercurial (the first version of Git was released about two weeks before Mercurial, so they are really the same age). Today, Git dominates.
Git was developed by Linus Torvalds, the person who developed the Linux operating system. He named Linux after himself, and he decided to also name Git after himself (“git” is British slang for a stupid person). Try typing
man git
on the command line and read what the NAME of the software is.
Using Git as a version control system allows communication with remote repositories (“repos” for short) hosted by services such as GitHub, GitLab or Bitbucket. These services provide university-affiliated people with a .edu email address with perks that include free private repositories. We will use GitHub for our bootcamp, and you should already have set up an account.
Remote repositories are not only a great way for keeping your data safe and in the cloud. They are also an excellent tool for collaboration since Git allows multiple users to edit the shared files simultaneously and has a method to merge changes afterwards. Public repositories can also serve as a vehicle to distribute code (or other files).
You can find more information about Git here. It is well documented. Here is an excellent one-page (front-and-back) cheatsheet.
Let’s get started. You all should have a version of Git installed on your computers. Open the terminal and navigate into your ~/git directory.
Configuring Git
While you already used Git in the set-up lessons, you still have some configuring to do. For this, and everything else in this notebook, we’ll use the command line. We will do the configuration with --global flags, which means these specifications work for all of your repositories. First, we’ll specify the name and email address of the person working with Git on your machine (that’s you!).
git config --global user.name "YOUR NAME"
git config --global user.email "YOUR EMAIL ADDRESS"
Git is very well documented and help is easily available. If you need to know more about config, for example, just enter:
git help config
Cloning Repositories
Your team’s repository is already set up and hosted on GitHub. You will need to clone it from its URL; you will have access to that once the teams are finalized. To practice cloning, we will clone one of the zillions of public repositories that are hosted on GitHub. We will clone a simple package, called insulter that will hurl Shakespearean insults at you. Enter the following on the command line.
git clone https://gist.github.com/3165396.git insulter
Note that the insulter package is now on your local machine. You have a copy of it on your own hard drive. You do not need to be connected to the internet to use it.
Now, cd to insulter and you can start using it, thou wayward tickle-brained flap-dragon!
python insulter.py
Pulling in changes
Actively developed repositories are constantly being updated. After you clone the repository, its authors (e.g., your teammates) may add or edit things in the repository. For you to get those changes, you need to fetch them and then merge them into what you have locally.
To fetch the updated repository, you guessed it, you do:
git fetch
The result is stored in a hidden directory, .git/FETCH_HEAD. (Directories that begin with a . are hidden; you don’t see them when you type ls without any flags.)
Now that there are changes, you would like to update your local repository. Provided you do not have any local edits, this is seamless. You just do
git merge FETCH_HEAD
Now your repository will be up to date.
A shortcut for the commands
git fetch
git merge FETCH_HEAD
run in succession is
git pull
In practice, you will use this a lot, but sometimes fetching and merging can be useful. Note that git pull is actually shorthand for
git pull origin master
which is the more verbose way of saying that you want to pull the master branch from the remote repository named origin. We will not discuss branching in this course, but it is an important concept to learn about.
Generally it is good practice to pull before you start working each day to make sure you pull in any updates your collaborators may have made.
Relationships among your local machine and your repository
Let us think about how we have things set up, referring to the excellent image below from Jessica Lord. For now, focus only on the blue portions on the right (ignore forking and the upstream repository). Remotely, in our case on GitHub, lives the repository that I created for your team.
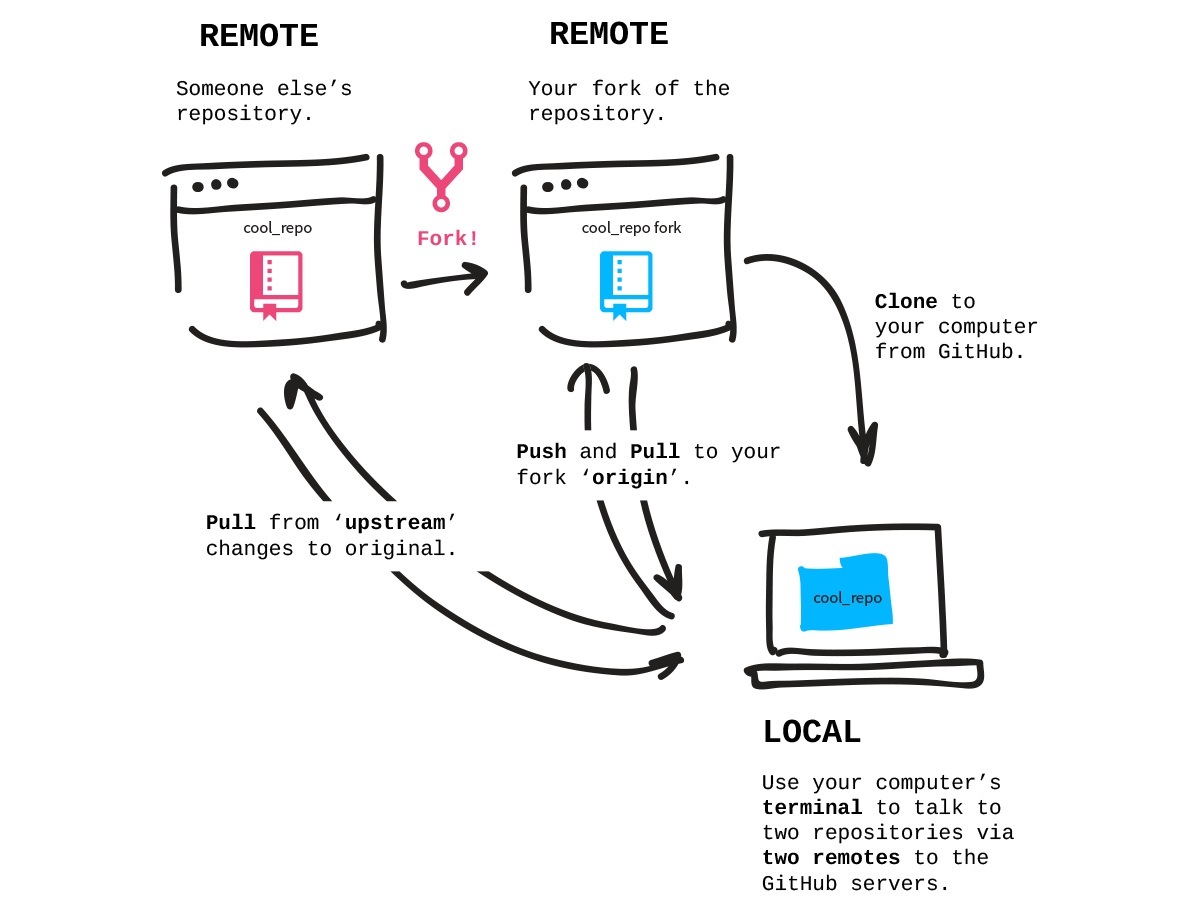
When you cloned your repository, you pulled it down from GitHub and put it on your local machine (probably your laptop). Whenever you make changes the repository, you do so on your local machine. You then add whatever files you changed to alert Git that you care about the changes and want it to keep them under version control. You then commit your changes, which tells Git to create a snapshot of exactly what the repository looked like when you did the commit. Associated with a commit is a commit message, which briefly describes what you changed on that commit. When you push your commits, they go to your team’s repository.
So, here is how the command line would look if you wanted to work on a file called my_file.py in your repository. First, pull in any possible updates from your teammates. Actually, let me say this more forcefully.
Always git pull when you start working.
The first thing you do on the command line is
git pull
Now that you have an updated repository to work with, you go to work and you edit my_file.py, let say by cleaning up some of the data wrangling procedures. You then need to tell Git add the file.
git add my_file.py
You might want to check to make sure you didn’t have other edits you want to add to the commit. You can do this by checking the status.
git status
The result might look something like this.
On branch master
Your branch is up to date with 'origin/master'.

Changes to be committed:
  (use "git reset HEAD <file>..." to unstage)

    modified:   my_file.py


Changes not staged for commit:
  (use "git add <file>..." to update what will be committed)
  (use "git checkout -- <file>..." to discard changes in working directory)

    modified:   another_file.py

Untracked files:
  (use "git add <file>..." to include in what will be committed)

    yet_another_file.py

no changes added to commit (use "git add" and/or "git commit -a")
In that status report from Git, it says the you modified a file called another_file.py that is already under version control (it has been added and included in a commit before), but you have not added it for this commit. If you want to add it, you would do
git add another_file.py
There is another file, yet_another_file.py that exists in the directory that you have never added, so Git is not tracking it. You can also add that for this commit.
git add yet_another_file.py
Now everything is ready to commit. To commit with a commit message, do the following.
git commit -m "Updated wrangling methods in my_file.py."
Git now has a snapshot of exactly what your repository looked like at the time of the commit. Now, the commit is still only on your local machine. In order for your collaborators (or the whole world, if it is a public repo) to have access to it (and in order for it to appear on GitHub), you need to ``push`` it. To do that, we do this:
git push origin master
Here, origin is a nickname for your remote repository. master is the name of the branch we are pushing to in the GitHub repository. I.e., it is the master copy. (We will not really talk about branches or branching.)
That is the basic set of operations to get your work into the repository and out to the remote for your teammates.
A note on commit messages
As just described, the -m after git commit specifies the commit message. This is a brief bit of text that describes what has changed in the repository. It is really important to write informative commit messages (and here are some beautifully described rules for good commit messages). By contrast, most commit messages that people write are useless.
Note that good commit messages also require that you commit often for incremental changes. Good commit messages is unfortunately one of my greatest weaknesses. But it should not be yours.
What to do in case of a fire
It is important to commit and push often. It helps collaboration and protects your work. So, what do you do in case of a fire in your building?
git add *
git commit -m "Building on fire, no time for meaningful commit message."
git push origin master
git out of the building
.gitignore
Notice in the sample output of git status above, Git let us know that there was an untracked file in the directory. Sometimes you do want to have files in the directories of your repository, but not keep those files under version control. Examples of these might be binary files, large data sets, images, etc.
Fortunately, you can tell Git to ignore certain files. This is done using a .gitignore file. Each line of of the .gitignore file says which files to ignore. For example, to ignore all files that end with .tif, you would include the line
*.tif
in your .gitignore file. The * is a wildcard character which says to ignore all files that have a file name ending with .tif, regardless of what the prefix is. Now, whenever you you use git status, any file ending with .tif that happens to be on your machine within the directories containing your repository will be ignored by Git.
Just because *.tif appears in a .gitignore file does not mean that all .tif files will be ignored. If you explicitly add a file to the repository, Git will keep track of it. E.g., if you did
git add myfile.tif
then myfile.tif will be under version control, even if other .tif files laying around are not. (Note, though, that you typically do not want to have binary files under version control. You usually only keep code under control. Typically only data sets used to test code are included in the repository. Version control is not really for data, but for code.)
Finally, since it begins with a .. When you put a .gitignore file in a directory, the .gitignore file will not show up when you run ls at the command line without the -a flag.
You have a .gitignore file already present in the repositories I set up for you. It is there to tell Git to ignore the files in the folder data/.
Additional information about using Git
This lecture gives a minimal introduction about Git/GitHub that you need for this class. You can get a bit more detailed view of this material from my bootcamp materials here. In recitation, the TAs will give you more tips and traps about using Git. Beyond that, there is much to learn about, in particular branching. For that and much more, there are plenty of great resources on the internet. GitHub has a good series of guides to get you started.
Computing environment
[1]:
%load_ext watermark
%watermark -v -p jupyterlab
CPython 3.7.3
IPython 7.1.1

jupyterlab 0.35.5